Before you start this process, you need to make sure that system admin has already gotten a SSL certificate for the website and installed it on the server.
Step one: Add HTTPS to WordPress Admin
To change WordPress from HTTP to HTTPS, the install URL must changed from
http://whatevername.byu.edu to https://whatevername.byu.edu.
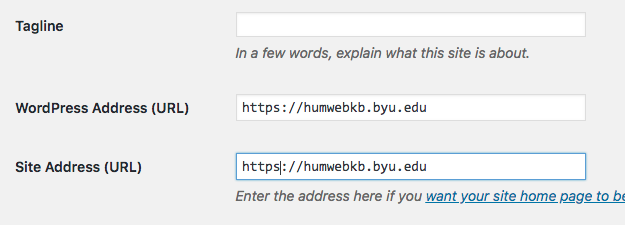
Login to your WordPress dashboard and navigate to Settings > General.
Ensure that the WordPress Address (URL) and Site Address (URL) are https. If not, add S after http to make https and save it.

Notes: sometimes the option is gray out, so you will need to change this from wp-config.php file.
define(‘WP_HOME’,’https://example.com’);
define(‘WP_SITEURL’,’https://example.com’);
define(‘FORCE_SSL_ADMIN’, true);
Step two: Force SSL for wp-admin
In fact, you need to modify wp-config.php in order to force SSL for wp-admin login.
Make sure this line is in wp-config.php.
define(‘FORCE_SSL_ADMIN’, true);
Open wp-config.php in your WordPress root folder and add the line above somewhere before where it says That’s all, stop editing!.
The constant FORCE_SSL_ADMIN can be set to true to force all logins and all admin sessions to happen over SSL.
To test out, login to https://hostname.byu.edu/wp-admin. (Run the test after you finish everything. Otherwise, you would still get some errors because you still need to configure website’s conf file and website’s ssl conf file on apace server)
Step three: Redirect http to https on apache configuration
In the virtual host configuration file at /etc/apache2/site-available/xxxxx.byu.edu.conf.
You need to add the following lines to redirect URL from http to https.
RewriteEngine On
RewriteCond %{HTTPS} off
RewriteRule ^(.*)$ https://%{HTTP_HOST}%{REQUEST_URI} [L,R=301]
For more details see
https://websiteforstudents.com/switch-wordpress-from-http-to-https-on-ubuntu-with-lets-encrypt-and-apache2/
Step four: Create new ssl configuration for the website
You either need to create a new ssl config for the website that you want to change from http to https or you need to add website’s information to existing ssl configuration file.
In the virtual host configuration file at /etc/apache2/site-available/newwebsite-ssl.conf.
The example of ssl configuration file.
<IfModule mod_ssl.c>
<VirtualHost _default_:443>
ServerName abc.byu.edu
## The following email address is setup in /etc/postfix/localusers
ServerAdmin webmaster@localhost
DirectoryIndex index.php index.html
DocumentRoot /var/www/html/abc
<Directory “/var/www/html/abc”>
Options FollowSymLinks
AllowOverride All
Require all granted
</Directory>
# ###### these are important information ########
SSLEngine On
SSLCertificateFile /etc/ssl/certs/server.crt
SSLCertificateKeyFile /etc/ssl/private/server.key
SSLCACertificateFile /etc/ssl/certs/ca.crt
## The directive ‘SSLCertificateChainFile’ was deprecated in v2.4.8
## SSLCertificateChainFile /etc/ssl/certs/ca.crt
SSLProtocol all -TLSv1.1 -TLSv1 -SSLv2 -SSLv3
SSLCipherSuite ALL:+HIGH:!ADH:!EXP:!SSLv2:!SSLv3:!MEDIUM:!LOW:!NULL:!aNULL
SSLHonorCipherOrder on
<FilesMatch “\.(cgi|shtml|phtml|php)$”>
SSLOptions +StdEnvVars
</FilesMatch>
# Possible values include: debug, info, notice, warn, error, crit, alert, emerg.
LogLevel warn
ErrorLog ${APACHE_LOG_DIR}/abc-ssl_error.log
CustomLog ${APACHE_LOG_DIR}/abc_access.log combined
</VirtualHost>
</IfModule>
Step five: change symbolic link files in /etc/apache2/site-enabled
Remember to remove symbolic file in site-enabled first and then add the new files including ssl conf in site-enabled.
/etc/apache2/sites-enabled# a2ensite abc.byu.edu.conf
/etc/apache2/sites-enabled# a2ensite abc.byu.edu-ssl.conf
Then, reload apache2.service
/etc/apache2/sites-enabled# systemctl reload apache2.service
Additional step
Warning: You really need to be careful on this step when you run the plugin. The following instruction is for the sites that are not hosting on the multisite. If you handled incorrectly, you can also screw up every single site on the multisite.
When I was working on this, I encounter an error, which shows that I have mixed files on the website. That means that some files still contain http instead of https. Therefore, I need to make sure that all files contact https, so I need a plugin to do the magic for me.
First, I go to the following site to find out more information of my new https website.
https://www.whynopadlock.com/
If I see, I have mixed files issues then I will need the plugin to resolve this problem.
I use free plugin – search & replace – to migrate all internal links.
In case, you will damage the website, you can always backup your website’s database before you use the plugin.

The plugin will find all links that contain http and then replace to https.
Make sure you “Select all tables” and try “dry run” first and then select “save change to database” to make necessary change.
If you use Google Analytics, you should also change your URL to HTTPS in Google Analytics.
